There are dozens of videos and blog posts demonstrating how to make sketchbooks. This isn’t really one of them. Then again, it sorta, kinda, is. I’m writing it because I mentioned that I’d made a couple small sketchbooks using brown paper in the Facebook group, Artist’s Journal Workshop. One of the regulars in that group asked if I could show how I made them. This post is what you might label a “Cliff Notes” (does that date me too much?) version of how to make a simple sketchbook. I encourage you to surf through the YouTube videos for better explanations.

What are we talking about here?
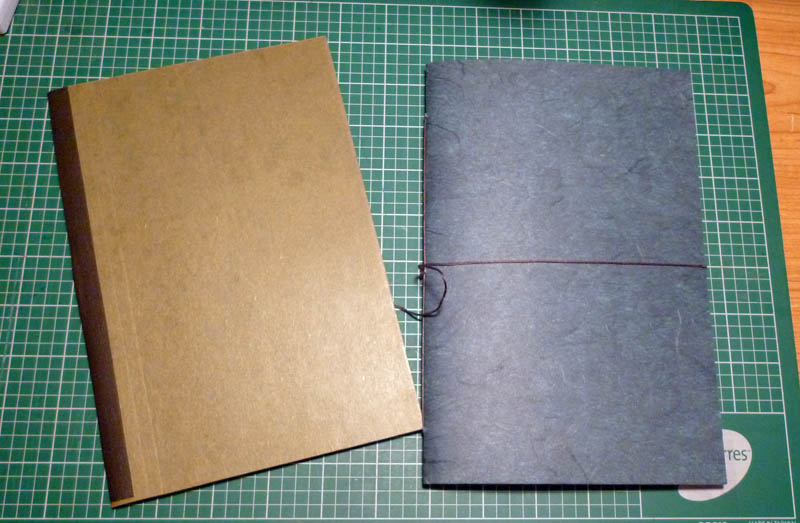
 These are the two sketchbooks I’ve made. Both are identical in construction. Both are 5.5×8 in size. The one on the left contains brown pages, cut from plain, cheap postage wrapping paper. I find this paper works well for pen drawings and you can even add light washes but it’s not very happy with too much water, however. The cover of this sketchbook is made by cutting a file folder to size. The benefit of this approach is that it’s already folded and the material is designed to act as a cover. In short, it’s ideal and easy. The binding tape (optional) is gaffer’s tape, a black, a fabric tape used to hold everything and anything together. Think of it as a heavy-duty masking tape, which could substitute for this purpose.
 The second sketchbook is composed of several colors of Canson mi-teintes paper. I believe this is listed as a pastel paper but people use it for pen and watercolor sketches as well. It’s not quite as smooth as the brown paper but it’s much thicker. The cover comes from a 12×12 sheet of heavy, patterned paper I got in the scrapbook section of the art store.
fff
fff
Besides the paper materials, what tools are required?
- straight-edge
- knife (Xacto, roller, or paper cutter)
- measuring device
- something to poke holes in the signatures (the folded paper) – I used a compass point
- large needle
- thread (see below)
- scissors
Cut and prep the paper
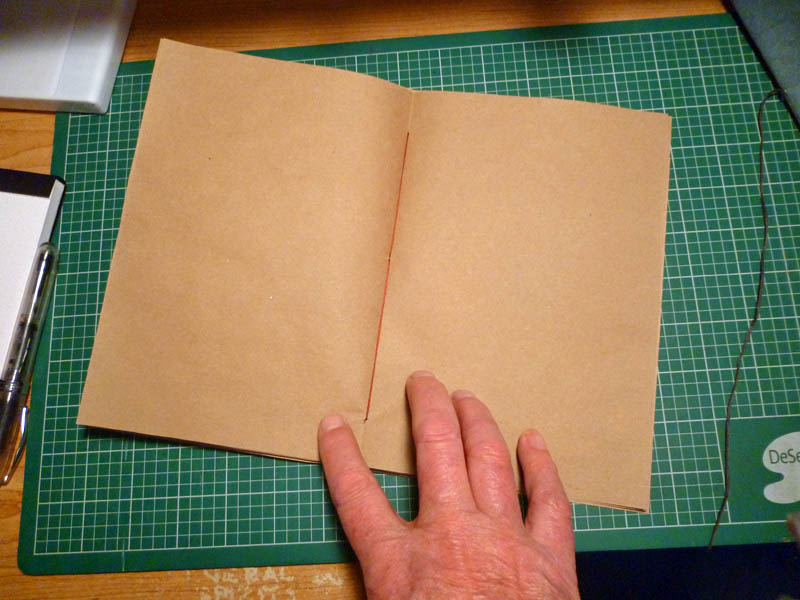
To make a 5.5×8 sketchbook, you need a bunch (I used 6) of paper squares cut 11×8. I’ll leave you to your devices to achieve this. Then you need to fold each sheet so that you have a two-page signature leaf that’s 5.5×8 inches. Use something hard and with an edge to crease the fold as tightly as you can. I found it desirable to actually iron (low heat) the brown paper pages as the paper came off a roll and tended to retain that curve.
Once you have these pages, simply stick them, one inside the other, creating a single, 12-page (or 24 if you count both sides) signature. The inner pages will stick out slightly beyond the outer pages. Trim them if this concerns you.
Cutting and prep the cover
If you’re using a file folder for your cover, just cut it to fit around the paper. Otherwise, fold your cover stock in half and cut it to fit around your paper. That’s all there is to making a cover.
Sew it together
There are lots of fancy ways to sew up sketchbooks. This ain’t one of those ways. My goal wasn’t to replace my beautiful double-stitched Stillman & Birn sketchbooks. It was to tie a few pages of colored paper together so I could sketch on them. So…easy-peasy…we don’t do hard.
 Before we get started, notice that there are three holes in the spine of this sketchbook. These are punched before we sew. Make the holes a bit larger than your threading needle to make the sewing easy but not so large that things get sloppy. Punching those holes could be considered the ‘hard part’ but remember, this is easy-peasy sketchbook making.
Get out your phone book and flop it open on a table. Open your sketchbook to its middle and stick the spine into the centerfold of phonebook phone book. Take your sharp thingie (you chose your tool), and stab through the entire sketchbook halfway down from the top and through the fold of the sketchbook. The phone book will hold everything in alignment and provide a place for your sharp gizmo to exit. Easy peasy. Now repeat that process an inch from the top and an inch from the bottom. Voila, the “hard part” is done.
Let the sewing begin. Use whatever thread you like but it should be fairly thick. There are special bookbinding threads available but I just used several strands of cheap embroidery thread and a large embroidery needle. There isn’t much to this…really. It’s harder to explain it than to do it. I’ve made a crude drawing of the thread path as an attempt to eliminate the proverbial 1000 words a picture replaces. The green arrows are when the thread is outside the book; the red arrows indicate the thread inside the book.
 There is one thing to note. The thread going into the center of the book, and the thread coming out of the center of the book, should be on opposite sides of the long run of thread that goes from top to bottom on the outside of the book.
Once you do this threading, just grab the two ends of the thread and pull everything tight. Then, tie a double knot in the two ends. Notice that this will cinch down on that long thread running along the spine. That’s why the ends need to be on opposite sides. I hope that is more clear than it sounds (grin).
Cut off at least one of the loose ends. Whether you cut the other end depends upon whether you want a long end to wrap around your sketchbook to keep it closed. I did this for my mi-teinte paper book because this thicker paper doesn’t want to close completely flat. I cut both ends on the brown paper sketchbook and then covered the entire spine with tape. I think this actually provides a better, cleaner solution but to each his/her own.
So there you have it – how I made a couple of quicky sketchbooks. Hope this helps someone.
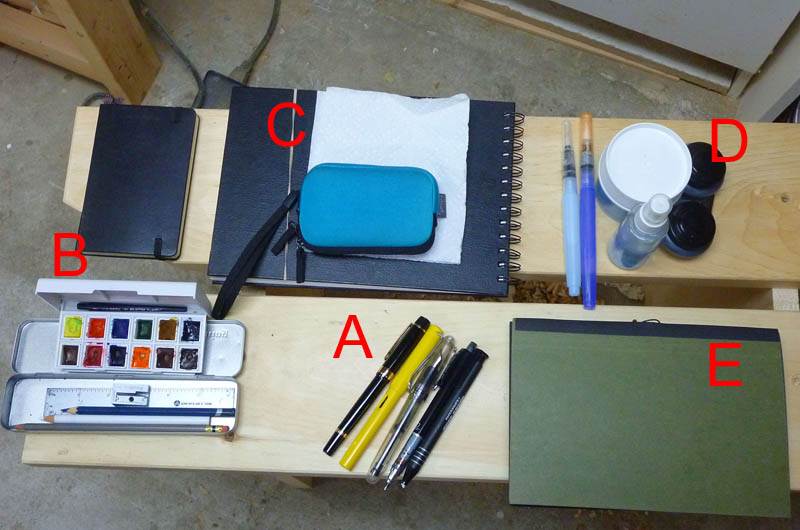
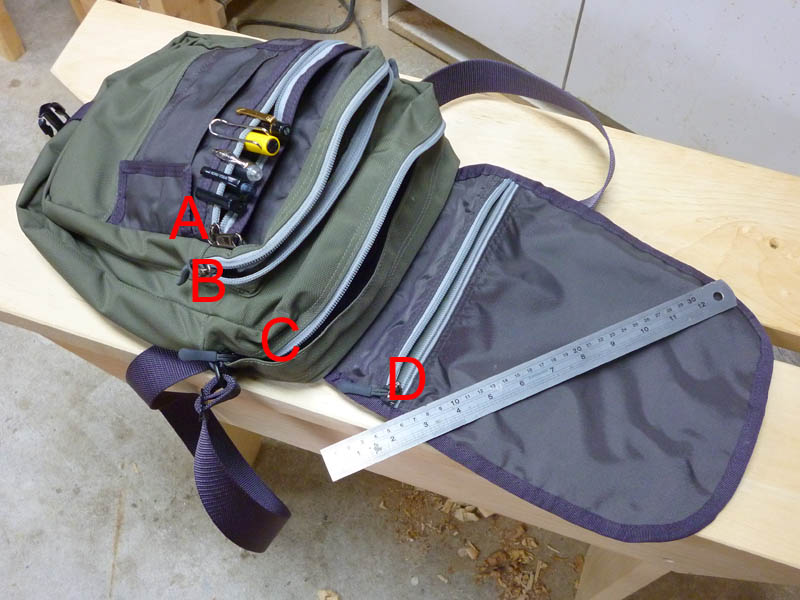 The bag has five main areas as well as a small pen compartment. All but the back compartment can be zippered shut but I rarely do this as the cover flap closes things up enough for me.
 Looking at the bag from the back, there is a large, thin compartment with no zipper. I have a couple thin, 5×8 homemade sketchbooks, made from toned paper, that live here. I also have a fomecore backing board for these sketchbooks in this compartment. Because this compartment is up against my side as I walk, I don’t put anything in here that’s lumpy but the sketchbooks seem happy there.